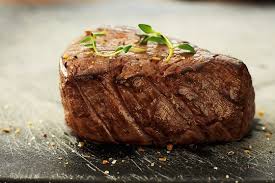
You can get a steak-house quality hunk of beef at home, if you have the right tools.

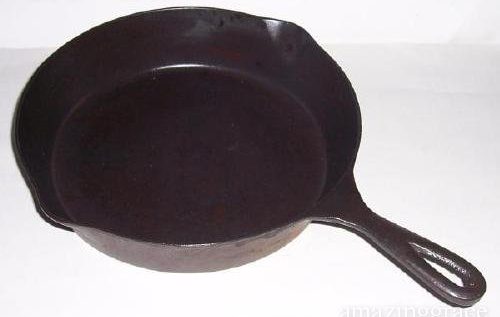
The biggest advantage a restaurant has that you do not in your home kitchen is the level of heat that can be delivered to the food. But you can make up for that difference with a simple, inexpensive pan. It’s our old friend, one of the most useful tools in the kitchen, a cast iron skillet. These things are nearly indestructible. But their best feature is the amount of heat they can take and pass on to the food. Scientists call that thermal mass.
In addition, cast iron skillets can safely go in the oven. That could be very important, depending on the steak method you choose.
If you are a year-round griller, invest in cast iron grates, not aluminum. In addition to great cooking, the grates give the steak that delicious cross-hatch sear on the meat.
Cast iron is not only the right tool for the job, it is inexpensive. A good cast iron skillet brand new can be bought for less than $50, depending on the size. Today’s cast iron might not be the traditional black, but that won’t change its performance. Also, most these days come pre-seasoned. That means they have been dipped into a coating that acts like a regular seasoning of the skillet so it can be used right away. Traditionally, one would heat and oil the skillet several times to get the seasoning started before you cook anything in it.
If you really want a good, traditional cast iron skillet, go to an estate or garage sale and get a used one. Even if it has been neglected, it can be brought back to useful life with a little work. In The Bachelor’s Kitchen, a cast iron pan is the single most useful one we have.

The second tool you need is a good set of tongs. Professional chefs and home cooks both will tell you a good set of tongs are a kitchen essential. They become an extension of the cook’s hands. Choose tongs that feel slightly heavy in the hand, and sturdy. And they should not be too long. There are uses for longer tongs, but most of the time they lack the heft to safely lift a heavy steak. For this job, you want a set with steel grips on the end, rather than silicone. Don’t get us wrong, we love our silicone-coated tongs for pasta or when using a nonstick pan. But for this job, you want something with a firm grip.
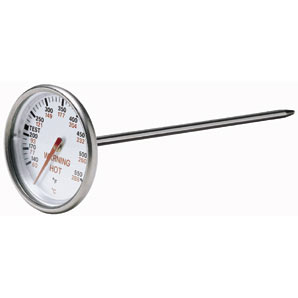
Finally, you need an Instant Read Thermometer. You should have one of these in your kitchen already, but as we have said over and over again, just because something looks done, does not mean it really is. While the likelihood of food contamination is small with steaks, it still exists. Also, it’s the best way to get that expensive steak just the way you like it. They are simple to use and also inexpensive. A simple analog/dial type is available for less than $10. You pay a bit more, up to $20, for a digital type. Just hold the steak up with your tongs so you can stick the thermometer probe into the center of the side of the steak, at least a couple inches deep, depending on the length of the probe. That will get the most accurate reading.

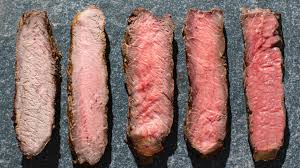
As for temperature, most of the time you want to get to about 140 F to be safe. That would give you medium rare, the best, in our opinion, level of doneness for a good piece of meat. If you remove the steak from the heat at about 5 degrees before your target temperature, it will be perfect after resting for a few minutes. Medium would be a final temperature of about 160 F. We never recommend well done for a good steak. A cheap hamburger, yes. A good steak, never. But if that’s the way you like it, you want a final temperature of 170 F.
Now that you have the tools, it is time to practice. That is the only way to ever improve your cooking skills. And think of eating all those steaks. Because a good steak is pricey you might want to start with some of the less expensive cuts, like a strip steak. Buy them when they are on sale and store them in the freezer. Just remember to take them out at least a full day, preferably two, to thaw slowly in the refrigerator. Take the steaks out to set on the counter and warm up to room temperature for about an hour before cooking.
A favorite method, especially for thicker steaks, is the sear-then-bake method. In that case, preheat your oven to 500 F. At the same time, put your cast iron skillet on high heat. Make sure the pan is cleaned of any oil or leftover seasoning first, otherwise, it will smoke up your kitchen. When the pan is screaming hot, season one side of the steak with simple salt and pepper. Place that side down on the hot pan and leave it alone for three to five minutes. The steak should begin pulling away from the pan when it’s time to flip. While that side is cooking, season the other side. I like to change things up on the second side by adding some Worcestershire sauce instead of salt and sprinkling with a pepper blend. Using your tongs, carefully lift and flip the steak, turning it away from you in case it splatters a little. Let that sear a minute, then place the skillet into the hot oven for five or six minutes. Check the temperature and either remove the steak or put it back in the oven for a few more minutes, depending on the level of doneness wanted.
We are sure that after a few practice runs, you’ll be ready to tackle that fillet or ribeye, just like the steakhouse.